A very Happy New Year to all our readers, we hope you enjoy the reports of our travels or even our technical articles.
And for those who can’t read, you could always look at the pictures of our travels here or here or here.
Enjoy, or not. Let us know what you think.
Monthly Archives: December 2010
2010 in Review, Month by Month, Minute by Minute
The End of the Noughties and the Start of the Teenies.
2010 was a much better year than 2009 even though I did go through the agony of attaining APA (aged pension age). And unlike 2009, we had none of the health and technical problems which kept us frustratingly at home for the whole year, waiting for the various wounds to our bodies and credit cards to heal.
And maybe two thousand and eleventeen will be even better.
Read on for all last years details…
January, medical tests
In January I had a follow up biopsy on my prostate, and all was well fortunately, it’s still stable and under control. We did have to postpone our Australia Day BBQ because I was a bit apprehensive about the outcome and we never did get around to organising a get-together. Maybe 2011 will be the year.
February, a literary phase
During February, we wrote up our 1974/5 travels in Afghanistan and submitted 2 articles for publication in the CMCA’s Wanderer magazine. The on-line versions can be read here and here, and our full blog with all the gory (and I mean gory) details can be seen here. It only took 36 years to get around to it but I saw no point in peaking too soon.
Also in February we were awoken one night by scratching at the window. We though it was the bloody cat, but it wasn’t, it was a bloody echidna (I get a bit cranky in the middle of the night) waddling along the front of our house. I took a few photos which it didn’t seem to mind and it wandered off to dig up someone else’s garden.

It was high summer by now and to provide a bit of shading and screening, I built a sun shelter for the pool at the end of the deck. I thought it turned out quite well but I asked J what we could add to give it a bit more character. She said “What about a bus timetable?”
 |
| Before… |
 |
| …after. Bus timetable? Bah Humbug, I wanted some murals! |
March was for computing
In March we saw Avatar in 3D. We’d been urged by the kids to see it and I have to say, as a Harry Potter hater, I actually thoroughly enjoyed it.
Mark and Mollie had a superb 3 week holiday in Bali and Thailand, including riding on elephants, playing with oran-utans, stroking snakes, eating insects, cuddling tigers etc, all the normal run-of-the-mill things you do on vacation.
 |
| A well fed tiger, hopefully |
While this was all happening, we bought a new laptop computer, an Apple MacBook, because we needed one and not just because Dick Smith had a 10% off everything sale. We did need a smaller, more modern computer anyway to take on our travels for navigation, communications and storage of photos etc. It fitted in the glovebox of our Oka just fine, and during our subsequent trip it was on continuously for 3 months and never missed a beat, over thousands of rough km up to the tip of Cape York, across the Gulf of Carpentaria and back.
April, the Wedding and a Birthday
In April, we flew to Brisbane (take a deep breath) for the wedding of Janet’s cousin’s daughter Michelle, to Paul, who is the brother of her twin sister Paulette’s husband, Trevor. It’s a complex family tree, but at least they now all have the same name, Smith (with 2 “F”s, according to Trevor). And even more scary is that we are all now related.
 |
| The Bride arrived in tears… |
 |
| …but cheered up immeasurably once she’d captured him |
It was a stinking hot day and the wedding was held in their garden but it all went very well. We decorated the entire garden, put up shade tarps and strategically placed 9 pedestal fans, plus dozens of extension cables, to cool the guests.
 |
| The party in full swing |
We celebrated the event in the usual merry way and discovered that you can actually dance the YMCA song to almost any tune. Not being able to spell also helps apparently.
 |
| “Y”, C”, “backwards C”… |
 |
| “A”, “Y”, “Y”, “Y”, “A”. .. “M”s are obviously too difficult |
 |
|
Family photo with 3 generations. George and Ethel made it to the wedding
but sadly George passed away a few months later
|
At the end of April, Scott celebrated his 30th birthday with a dinner at the Caledonian Hotel in North Adelaide. It was good for us to catch up with all his old mates again.
 |
| Scott’s 30th birthday bash |
May, vehicle preparations
During May I fitted airbag suspension to the rear of the Oka. Why did I do this? Well even the strong new springs tend to sag under 6 tonnes of Oka when overloaded for our outback treks and this can (and has) lead to structural failures, which we can’t risk on remote outback tracks. Airbags take half of the load off the springs and make the ride a whole lot smoother over the shattering corrugations we frequently encounter.
Fitting airbags took a lot of cutting, welding and grinding of 5mm sheet steel, and a lot of precision fiddling to make the mounting brackets and fitting of air controls so we can inflate and deflate them from inside the cabin. That allows us to independently raise and lower the rear suspension height on each side, depending on load and track variations, and also allows us to level the vehicle at night so my wine doesn’t slide off the table.
 Airbag installed Airbag installed |
June, we reached the Tip of Cape York
In early June we set out on a trip up to the tip of Cape York. Our route took us up to Broken Hill, then left and north through Tibooburra and outback Queensland to Mareeba on the Atherton Tablelands, just inland from Cairns and up a bit.
 |
| The GPS Track for our Cape York/Kunnunurra trip |
Mareeba was a rest and repair stop before heading 800 km up though the central rain forest tracks of Cape York to stand at the northernmost point of the continent. It’s 4,400 km from Adelaide in almost a straight line north and took 4 weeks.
 |
| Standing at the Tip. Later I stood behind the sign so technically I was further north than north |
The east coast of the Cape is warm, wet and very windy but the western side is hot, calm with beautiful beaches. Of course swimming is out due to crocodiles but we did take a day trip to Thursday Island only 140 km south of PNG. The people of the Cape were very friendly Torres Strait islanders, without the hang-ups of mainland Aboriginals, and we enjoyed the small towns and communities on the Cape, places we had never heard of like Bamaga, Seisia, Injinoo, New Mapoon and Umagico.
 |
| Sunset over the Coral Sea from Seisia |
 |
| Best Fish and Chips ever, Spangled Emperor at Portlands Roads |
July, “cruising” Highway One
After stopping off in Weipa for restocking of supplies, we headed back down the Cape to Mareeba for some more repair work before heading west though Nevil Shute’s “Town Like Alice” country, Normanton, Croydon and Burketown as we crossed the Gulf of Carpentaria on Highway One, but not like the one we have down here. Although it’s the same road, their Highway One is a rough, dusty gravel track bisected by numerous creek crossings and other spectacular water features.

|
Road junction in the middle of a creek crossing on Highway One
|

|
Leichhardt Falls, near Burketown
|
August, meeting up with Charles and Fred
It’s a long trip to Katherine from Cape York (0ver 2500 km) but we had a reason to go that way. Charles and Fred were heading out from the UK to pick up their caravan in Katherine and continue their grand tour of Western Australia and we wanted to cross paths with them. Well, we met up with them and helped drink some wine and then get their caravan back on the road.
 |
| The Team at Lake Argyle, blahdy blahdy times bigger than Sydney Harbour |
We then travelled with them west as far as Kununurra before we had to part company and return to Adelaide while they continued their trip across to Broome and down the west coast to Perth before also heading back to Adelaide for another meeting. But without any help from us they managed to shred 2 tyres doing so.
September, the long trek south
Our trek took us 14,000 km over 3 1/2 months and, while we had a few problems as usual, this time mostly electrical, it was a very enjoyable trip. We only got bogged twice and the Oka, with its new airbags, performed very well. You can read all the details on our blog entries here (there are 7 sections). We are already planning our next trek across some more Len Beadell tracks in Western Australia. Actually I just wrote some up and published notes about Len Beadell and his tracks here.
 |
| Sturt Desert Peas near Gendambo |
On the last leg of our journey south I past another milestone, I reached Aged Pension Age. We celebrated in Tennant Creek and after numerous visits to Centrelink offices all over the country I now get both an Australian and a UK pension. I even discovered that Ferranti, who I worked for in the UK and left in 1974, had a pension scheme, and although the company went bust in 1978, the funds had been invested with Prudential and I am now entitled to a pension from them too, small, but better than a smack in the head.
October, the wilderness tamed
Janet’s birthday passed quietly in October due mostly to the frenzy of gardening needed to clear the forest of 2 m high weeds and fallen trees that had cause most features of the garden (walls, steps, sheds etc) to completely disappear.
 |
| Where’s the garden? |
 |
| 2 weeks later, ah, there it is |
The Commonwealth Games were now fast approaching and as is usual at these times, we bought a new TV. The last time we bought one was for the 2000 Sydney Olympics. The new TV has a 42 inch screen and fits neatly into our corner cabinet (a primary criterium) but I had to build some new loudspeaker boxes because, while the new TV has a superb high definition LED/LCD screen, it is so thin that it has no room for decent speakers and it sounds like a 1960’s transistor radio.
One of the few mechanical problems we had with the Oka on our Cape York trip was a leaking power steering box. We kept the leak under control using a modified wine cask bladder (which we had to empty first) and when we got home I bought a seal repair kit and we replaced the leaking seal. Not an easy task but successful.
Also in October we received an invite to our niece’s wedding (Jules to Matt) next Feb, on a beach north of Wellington in New Zealand. Our passports had expired so we had to apply for new ones (which are not cheap, they obviously don’t want people leaving the country, at least not with any money) and book tickets for the trip. We’ll be away for 3 weeks so we can catch up with Myra, Clive and Melissa as well, and do a bit of a tour of the north island while we are there.
November, Scott moves to Melbourne
Scott has moved to Melbourne. He and Tash had been planning this for some time. Tash was finding it difficult establishing a good career in Adelaide (she has a degree in marketing and is doing a Masters in Business Management or something) and Scott was looking for a broader opportunities in the hospitality industry. So they rented out their house in Windsor Gardens and are renting a town house in Footscray, only 15 minutes from the Melbourne CBD, but with a small garden for their little dog, Harvey.
 |
| Cute little Harvey. He’s a bit bigger now. |
Our task, of course, was to fix up his house and garden and render it suitable for renting. That meant repairing windows, doors and fly screens and shifting a mountain of mulch to around the back yard. It was a stressful time for everyone, especially when we recalled that we also left home at around the same age and shot off around the world. Now we know what it felt like for our parents. However, after a shaky start they have both found good jobs (with Pacific Brands and the Crown Casino respectively) and seem happy with the move.
December, Christmas preparations
Christmas shopping was impeded this year by receipt of a Parking Infringement Notice at Tea Tree Plaza. You would surely expect them to be attracting people in to their shops in these times of financial stress, not peeing them off, but apparently not. Our infringement was for overstaying the 5 hour limit but we would have had to been up way before dawn for that to be true, which is not like us at all. We were actually only there for an hour and a half so we are now in dispute with the council over this imposition, and in the true spirit of Australian judicial fairness, we now have to prove our innocence through phone calls, emails and statutory declarations. I’m considering a class action to recover punitive damages for mental stress, not to mention the $22 penalty.
Apart from that we had a pretty quiet Christmas and we’ll see you all in the first year of the second decade of the the third millennium.
In the Wheel Ruts of Len Beadell
Rut: a long deep track made by the repeated passage of the wheels of vehicles.
I was going to call this article “In the Wheel Tracks of Len Beadell”, but 2 things stopped me. Firstly, the name has already been used for a similar travel article, and secondly, “ruts” more accurately describes the current conditions of his tracks. Alternatively, the words furrow, groove, corrugation, trough, ditch, hollow, pothole, wash-away or crater would not be inappropriate.
This is not Len Beadell’s fault of course, his job finished in the 1960’s and almost no maintenance has been undertaken since then. What’s actually surprising is that most of his 50 year old bush tracks are still navigable at all. But more importantly, Len Beadell’s tracks provide a great outback driving experience, with some challenges and excitement thrown in, and along the way you can’t help but get caught up in the history and scenic splendour of this part of Australia.
 |
|
A typical sample of a Len Beadell track.
The Sandy Blight Junction Road heading north towards Mt Leisler
|
Click on Read More below on for some history surrounding Len Beadell and our account of travels on some of his tracks.

Len Beadell’s History
You don’t have to point your vehicle far off the bitumen in southern or western Australia to come across the name of Len Beadell. Len Beadell is one of Australia’s best known modern day pioneers and a quick Google search will provide access to thousands of sites, so there is no shortage of information about the man and his mission
Starting his working life as an army surveyor in SE Asia during WW11, he subsequently joined the Weapons Research Establishment in Salisbury, South Australia (now the Defence Science and Technology Organisation (DSTO)) and was instrumental in developing most of the infrastructure to support the British atomic tests carried out in the remote west of South Australia during the 1950’s and 60’s.
 |
| The Gibson Desert from McPhersons Pillar just 30 km off the Gary Highway, built by Len Beadell in 1963. It looks deceptively green and pleasant but we are 300 km from the nearest habitation (at Warburton) and it was scarily remote. We saw no one for 5 days. |
As part of that 8 year program, he surveyed and selected the location for the Woomera Rocket Range, the Giles Meteorological Office, and the Emu and Maralinga atomic test sites.
Integrating these facilities with existing highway and rail access meant the development of 6,000 kms of linking roads and tracks covering 2.5m square km of then undeveloped areas across South Australia, Western Australia and the Northern Territory.
Integrating these facilities with existing highway and rail access meant the development of 6,000 kms of linking roads and tracks covering 2.5m square km of then undeveloped areas across South Australia, Western Australia and the Northern Territory.
A mudmap of Len Beadell’s tracks can be found on the Beadell Tours Home Page here and a more detailed map of Len Beadell’s outback road network and a complete anthology of all his work is contained in “A Lifetime In The Bush“, a biography of Len Beadell © Mark Shepard, available from Westprint.
 |
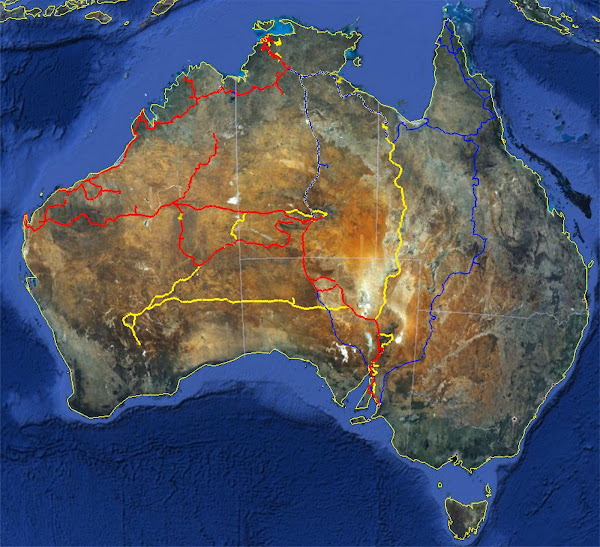
|||||
|
The tracks we have covered are the red and blue coloured GPS route plots on this map, which covers an area of roughly 2000 km by 1500 km (3 million sq km).
And not a speck of bitumen to be seen. |


Some of these roads and tracks have gone on to become major outback highways (sand and gravel, no bitumen) linking remote desert communities, while some have succumbed to the forces of nature and all but disappeared, but his work will be remembered mostly for the construction of his most famous track, the Gunbarrel Highway
 |
| Gunbarrel Highway heading east towards Mount Beadell in the far distance |
 |
| Sandy Blight Junction Road heading north towards Mt Leisler |
The Gunbarrel Highway was not the first of Len Beadell’s tracks, (the first was the eastern end of the Anne Beadell Highway from Mabel Creek to Emu), but it is his most famous and it was the “straightness” of the track building process he used that inspired the name of his “Gunbarrel Road Construction Party”. Actually, the Gunbarrel is not straight at all if you look at the map, it meanders around geographic obstacles and between lakes and sanddunes. But it was his method of surveying ahead in his LandRover and then signalling to the graders behind to follow his signs in a straight line which gave this construction method its name.
Criss-crossing the deserts of South, Central and Western Australia, Len Beadell built a series of tracks stretching west from Coober Pedy to Laverton (the Anne Beadell Highway), from Kulgera to Willuna (the Gunbarrel Highway) and from Alice Springs to Talawana (the Gary Junction Road). He also built corresponding tracks north from Cocklebiddy to Warburton (the Connie Sue Highway), and then on to Sandy Blight Junction, from the Trans-Australian Railway through Maralinga to Emu, and northwest to 80 Mile Beach (the Gary Highway and Callawa Tracks).
 |
| Veevers Meteorite Crater, 16 km east of the Gary Highway. 80 m across and 15 m deep, only discovered in 1975 and confirmed as an impact crater in 1984. Original 1975 hand written notes are still there in the visitors book. |
Our Interest in Len Beadell
Once we started to learn a bit about the man and his achievements, we got drawn into knowing more about his tracks and how he built them, and a yearning to follow his grader tracks to see what remote desert travel is all about.
We have read most of his books, studied his activities and heard tapes of his talks. He was a very independent, self-sufficient person and a very funny writer with a sharp wit and laid back style. This must have made him a joy to have at dinner parties but a bugger to work with.
During the 60’s and 70’s, Len Beadell became good friends with American experts in meteorite craters, Eugene and Carolyn Shoemaker. On visits to Australia they had been researching the Veevers and Connolly Basin craters, access to which had been made possible by the newly formed Gary Highway and Talawana Tracks. They even named an asteroid after him, 3161 Beadell (1980 TB5), 12.5 km diameter. Tragically, Eugene Shoemaker was killed in a car crash on the Tamami Track in 1997 and his ashes were buried on the moon, the only person to date who has been accorded that privilege.
 |
| Everard Junction at the end of the Gary Highway on the Gunbarrel Highway. It doesn’t look it, but it was a stinking hot 40º that day |
Sadly, although we never talked with Len Beadell himself, we did meet him once in his later life at our sons’ school speech night in 1995, (as a local dignitary, Beadell House was named after him at Trinity Collage, Gawler). He was too unwell to speak himself so his wife Anne gave a wonderful account of life with Len and their time on the road, on the few occasions he allowed his family to come along.
More recently we were even sadder to read of the untimely death of his wife Anne, on 24th November 2010, aged 69. They were married in 1961 and had what must have been a whirlwind 34 year relationship until Len’s death in 1995.
 |
| Mt Beadell on the Gunbarrel Highway, a fitting memorial to Len Beadell |
Anyone who has travelled an outback track in searing heat (and not necessarily in summer time either) can relate to the sentiments in these short extracts of a poem by Barcroft Boake, written around 1890. He might have been describing the conditions Len Beadell would face during the construction of his as yet unbuilt tracks.
Out on the wastes of the Never Never –
That’s where dead men lie!
There where heat-waves dance forever –
That’s where dead men lie!
Out where the grinning skulls bleach whitely,
Under the saltbush sparkling brightly,
Out where the wild dogs chorus nightly,
That’s where the dead men lie.
This poem sends a forceful and realistic message about Australia’s harsh outback that’s still valid today. It can be read in full here.
I have to say that in our air-conditioned and insect-proof 4WD motorhome, with all the comforts of home and the safety features of modern navigation and communications systems, it’s difficult not to admire what Len Beadell achieved, all alone for months at a time with a very rudimentary equipment and transport, in a very harsh and then unknown (to Europeans) country. It’s just as harsh and almost as unknown now, 50 years later, and his tracks are just as long and remote as they ever were.
This quote from Heather Schmidt sums up his achievements perfectly:
Len Beadell
Did exceedingly well
To traverse our geology
Without modern technology
We even made up our own silly little clerihew*:
David and Janet
Each with a flynet
Endured all the cracks
On Len’s outback tracks
* a witty, four-line verse that pokes fun at people
 |
| McDougall Knoll on the Gary Highway. Visitors notes are in a tin can jammed in the cairn |
Our Travels on Len Beadell’s Tracks
In the past 6 years we have travelled many of Len Beadell’s tracks, some quite deliberately, and some just to get from A to B. The first pretty obvious observation is that they are all very long and very remote, so a lot of advance planning is essential. It can be an adventure in itself just to get to the start of most of his tracks.
The second thing we discovered is that, with a couple of exceptions, all Len Beadell’s tracks are sandy or gravel single lane tracks requiring a high clearance 4WD since they have almost never been maintained in the 50 years since they were built. Most are narrow and corrugated with frequent wash-aways and occasionally overgrown. Len Beadell never built them for casual tourists (they were scientific roads after all) and they are therefore not suitable for caravans or low clearance vehicles. Even his own vehicles suffered many breakdowns and failures, and one even caught fire; his ration truck was destroyed near Kiwikurra while building the Gary Junction Road in November 1960.
 |
| Anne Beadell Highway, long and straight, but rough. Paint will get scratched |
The third thing to be aware of is that, for the most part, there are no buildings, habitation or facilities of any kind along most of Len Beadell’s tracks and travellers should be totally self-sufficient in terms of fuel, food, water and vehicle support. An HF radio or satellite phone should also be carried for emergencies.
Possible exceptions to this are are the Gary Junction Road, sometimes used as a shortcut from Alice Springs to Marble Bar, and the West Australian section of the Great Central Road from Yalara to Laverton. Both these roads have been redeveloped and are regularly maintained and can be used by sturdy 2WD vehicles, but they are still long and remote gravel roads with widely spaced facilities and the need for considerable advanced planning still applies.
 |
| Tropic of Capricorn signs on the Gary Highway |
Strictly speaking the Great Central Road is not a Len Beadell road, but it does follow the general line of some of his tracks and certainly crosses the same geographic area. Neither is the Canning Stock Route a Len Beadell track since it already existed before Len Beadell built his roads, but it does integrate into his overall road network and is a similar type of track.
Some original Len Beadell tracks are no longer accessible, either due to deterioration (eg the abandoned eastern section of the Gunbarrel Highway) or have been absorbed by Native Title restrictions (the Callawa and Mt Davies Tracks). Native Title restrictions are also having an adverse impact of many other tracks as well and obtaining permits may prove difficult, see this report.
 |
| Gary Junction Road, one of the better maintained tracks |
Our own experiences with a big strong 4WD on Len Beadell’s tracks includes broken springs, broken drive shafts and various broken bolts, not to mention body damage from trees and bushes overgrowing the tracks, which can also break off wing mirrors, side lights, aerials and any other protuberances. Punctures however have been relatively few since his tracks across predominately sandy or gravel deserts, but staking of tyre walls on tree roots or fallen branches just off the sides of tracks is always a serious risk, especially with low tyre pressures, so 2 spare wheels, a repair kit and keeping to established wheel tracks is a good thing.
Trailers are certainly NOT recommended on Len Beadell tracks either unless they are of very strong off-road construction and even then passing other vehicles is made more difficult, with one or both vehicles having to clamber up the side of the track to create passing space. We have seen many broken and abandoned trailers during our travels and rough outback tracks are just no place for them.
Despite the technical risks and distance from help, there is a strong sense of exhilaration and achievement just to travel on such remote and scenic tracks, built 50 years ago, which very few people will ever experience. And they are remote, on the Gary and Gunbarrel Highways, for 5 days and 800 km from Kunawaritji to Warburton, we saw not a single vehicle or person. Our HF radio provided our only contact with the world.
 |
| McPhersons Pillar 30 km east of the Gary Highway. Possibly the remotest point from help on all our travels so far, more than 300 km by road from the nearest habitation |
Len Beadell Tracks we’ve covered
We have travelled many of Len Beadell’s tracks for which we have compiled blog articles describing our experiences. Don’t forget to add distances to and from these tracks to the nearest facilities.
- Gary Junction Road, Alice Springs to Kunawaritji (Well 33 on the CSR). Easy going but long, 1200 km. Several Aboriginal communities selling supplies and fuel.
- Talawana Track from Well 22 on the CSR/Georgia Bore to Newman via the Rudall River National Park (reference in here). Fairly easy going (rough in RR NP) but remote and lonely, and further than it looks, 500+ km inc. Rudall River visit, (800 km from Well 33), with no facilities.
- Anne Beadell Highway, from Coober Pedy to Laverton (see also here). Very long, 1500 km, narrow and very corrugated. Only one fuel stop, at Ilkurlka, 750 km west of Coober Pedy. No water on SA section, rain dependent tanks on WA section.
- Sandy Blight Junction Road, from Giles to Sandy Blight Junction. Tortuous, rough, narrow but one of his more interesting tracks, 400 km. No facilities.
- Gary Highway, Kunawaritji to Everard Junction on the Gunbarrel Highway. Straight, corrugated but with interesting side trips, 400 km. No facilities.
- Gunbarrel Highway, east from Everard Junction to Warburton (reference in here), 400 km. Mostly straight, long and corrugated. The Gary and Gunbarrel Highways together total 800 km with no facilities.
- Canning Stock Route, top section only from Halls Creek to Well 22 via Kunawaritji (Well 33) (references in here and here and here). Very long, 1000 km (700 km to K, plus 300 km to Well 22) and remote from help, with many steep and difficult soft sand dunes, but a great drive.
Note: the CSR is not a Len Beadell track but it could have been, except that Alfred Canning had already surveyed the track in 1906 and completed its development by 1910. The compelling story of the Canning Stock Route deserves to be the subject of a separate article but it has a link with Len Beadell, since as part of his development of the Talawana Track, he re-discovered several of the wells on the CSR that had been lost by the ravages of time.
#rage_css_map {
background-image: url(http://lh6.ggpht.com/_WglGCzgazMg/TRa2QIgjIwI/AAAAAAAAFuQ/0A5Q5RZtcUI/s600/rage_css_imagemap0.jpg);
height: 548px;
width: 602px;
position:relative;
}
#rage_css_map #shapes a {
position:absolute;
text-decoration:none;
}
#rage_css_map #shapes a span {
visibility:hidden;
}
#shapes a#rage_sandyblightjunctionroad{
top: 210px;
left: 223px;
width: 37px;
height: 37px;
background-image: none;
}
#shapes a#rage_sandyblightjunctionroad:hover{
border: 1px solid #FF8802;
background-image: none;
}
#shapes a#rage_sandyblightjunctionroad:active{
background-image: none;
}
#shapes a#rage_garyhighway{
top: 203px;
left: 152px;
width: 69px;
height: 69px;
background-image: none;
}
#shapes a#rage_garyhighway:hover{
border: 1px solid #FF8802;
background-image: none;
}
#shapes a#rage_garyhighway:active{
background-image: none;
}
#shapes a#rage_garyjunctionroad{
top: 203px;
left: 208px;
width: 88px;
height: 15px;
background-image: none;
}
#shapes a#rage_garyjunctionroad:hover{
border: 1px solid #FF8802;
background-image: none;
}
#shapes a#rage_garyjunctionroad:active{
background-image: none;
}
#shapes a#rage_canningstockroute{
top: 128px;
left: 167px;
width: 53px;
height: 78px;
background-image: none;
}
#shapes a#rage_canningstockroute:hover{
border: 1px solid #FF8802;
background-image: none;
}
#shapes a#rage_canningstockroute:active{
background-image: none;
}
#shapes a#rage_greatcentralroad{
top: 239px;
left: 215px;
width: 80px;
height: 20px;
background-image: none;
}
#shapes a#rage_greatcentralroad:hover{
border: 1px solid #FF8802;
background-image: none;
}
#shapes a#rage_greatcentralroad:active{
background-image: none;
}
#shapes a#rage_annebeadellhighway{
top: 292px;
left: 172px;
width: 182px;
height: 23px;
background-image: none;
}
#shapes a#rage_annebeadellhighway:hover{
border: 1px solid #FF8802;
background-image: none;
}
#shapes a#rage_annebeadellhighway:active{
background-image: none;
}
Our recent treks which include Len Beadell’s outback roads.
Roll mouse over the photo and click on tracks to visit articles in a new tab.
Roll mouse over the photo and click on tracks to visit articles in a new tab.
Future Tracks
We plan to tackle these Len Beadell tracks in the future.
- Connie Sue Highwy, Cocklebiddy to Warburton
- Gunbarrel Highway, west from Everard Junction to Willuna
- Talawana Track, Talawana to Windy Corner on the Gary Highway
- Kidson Track (not a Len Beadell Track but traverses the Great Sandy Desert in a similar direction to the Callawa Track)
- Callawa Track, (an extension of the Gary Junction Road from Kunawaritji to 80 Mile Beach but no longer gazetted as a vehicle track and now inaccessible)
References
In The Wheel Tracks of Len Beadell, 2 articles by Laurel and Gordon Rollinson in the Oka Owners Group News letters of April and August 2003, see here and here.
They are also available at ABC Shops and Westprint.
Anne Beadell Highway
Firstly the Anne Beadell is NOT a highway. It’s a sandy, corrugated, single lane desert track and quite overgrown for long stretches. And although fairly straight and mostly flat (with a few wash-aways),it is a very long track (nearly 1500 kms from Coober Pedy to Laverton, including essential side trips) and crosses the Great Victoria Desert.
There are almost no water sources along the track and only one fuel supply point, at Ilkurlka, 170 kms west of the WA/SA state border, 700 kms west of Coober Pedy. The track is very corrugated and can take at least 7-10 days, plus an allowance for breakdowns and other stoppages.
We did it in about 11 days in the company of 2 other vehicles, which was very handy for the inevitable problems and breakdowns.
Read on for all the details of our trip…
The Anne Beadell Highway completely traverses the Great Victoria Desert in South and Western Australia.
Several permits are required for the track since it crosses 2 National Parks, the Woomera Prohibited Area and aboriginal land in both states.
 |
| Rough map of the Anne Beadell Highway (from http://home.vicnet.net.au/~fgvd/facts.htm) |
The track is also very narrow and corrugated for most of its length so breakdowns are common and should be anticipated. There are a few winding sand dune areas to add interest but it’s no place for trailers and certainly shouldn’t be tackled alone. Fortunately (actually through good planning) we were in the company of 2 other vehicles which proved invaluable when the inevitable breakdowns occurred, which we all suffered to some degree.
 |
|
It started off quite wide and smooth…
|
 |
|
…but got progressively narrower and rougher
|
Due to the nature of the track, going will be slow and the whole trip to Laverton will take from 7 to 10 days, more if breakdowns happen, so supplies and provisions should be taken accordingly.
 |
|
I did say it’s a bit corrugated…
|
We actually took about 11 days and met quite a number of vehicles coming the other way. Some were driving way too fast, to do it in 3 or 4 days, and you can’t enjoy it much like that, quite apart from the increased risk of breakdown.
The SA section of the track is certainly the worst as far as corrugations go. The WA section is better but still not very good, but has been graded for short distances around Ilkurlka Roadhouse. The Yeo to Laverton section is excellent.
Water is available at 3 rest areas on the WA side of the border (assuming rain has replenished the tanks), but there is NO reliable water available on the SA section.
However, there are quite a few points of interest, plus some impressive desert scenery. More importantly, it’s a remote travel adventure that few people have ever heard of let alone ever go on. It’s not hot during normal winter travel periods so lack of water is not the severe problem it might be on more northerly tracks. In fact it was so cold we could have a campfire every evening and enjoy a comfortable walk up the sand dunes during the day, and there weren’t many insects about either.
Mabel Creek.
The track starts at Coober Pedy and this is where all our fuel and water tanks were filled to the brim. The first 50 km was fine as it follows Mabel Creek Station tracks, then it started to get progressively narrower, rougher and more corrugated.
Tallaringa Well.
The first point of interest is Tallaringa Well, an important aboriginal water source that had first been discovered by European explorer Richard Maurice in May 1902 (see this report), but had then been lost for years until Len Beadell rediscovered it in 1951, during his survey of the eventual Anne Beadell Highway from Mabel Creek Station to Emu. See this SA Memory site.

|
Len Beadell’s plaque at Tallarniga Well
|
|

Although the Len Beadell plaque here is dated 1951, the track was actually built in stages from 1953 until its completion in 1962. The reason is that this area was surveyed for atomic test sites in 1951 and centre line pegs from Woomera were marked out before the Anne Beadell was built. Len Beadell rediscovered Tallaringa Well in June 1951 whilst surveying for the nearby 250 Mile peg.
The well was not in good condition and it may or may not have accessible water in it. Even if it does, I don’t think I’d drink it unless desperate, and anyway it’s only 200 km to/from Coober Pedy. There is much more remote country to follow and reliance should not be placed on natural water sources.
Dingo Claypan
This small claypan is on a side track about 50 km north of the Anne Beadell and was the initial aerodrome prepared by Len Beadell to allow supplies to be flown in for the atomic test sites.

 |
|
Wet looking, but glassy hard surface on Dingo Claypan
|
It has a wet looking, but glassy hard surface and the 44 gallon drums marking the landing strip can still be seen in the lake surface. There are also plenty of other drums laying around the area, some still containing fuel.
 |
|
Fuel drums at Dingo Claypan, some still had fuel in them
|
The 300 M peg (down range on the centre line from the Woomera launch site) is accessible from Dingo after driving around the claypan and then a further 9 km into the scrub on a marked track.
 |
|
The 300 Mile Peg plaque
|
 |
|
The 300 Mile peg near Dingo Claypan
|
While we were at Dingo Claypan, we had to remove the front bullbar to replace a broken bolt. This is not an easy task on any vehicle and especially an Oka, but luckily we had fellow travellers with us to help with the heavy lifting.
 |
|
Repairing a broken bolt on the bull bar
|
We also had to fix a slow puncture and recover fuel from a leaking spare tank. Just the usual problems we expect to face on a rough outback track. Other breakages included aerials, the overhead fan which broke it mountings and pop rivets which popped from the aluminium brackets holding the solar panels. Oh, and the front drive shaft broke. More on that later.
Atomic Test Sites.
About 6 km past the Dingo Claypan turn off is a track to the sites of the actual atomic tests.
Two bombs were detonated at Emu Field on the 15 and 27 October 1953, and 7 more subsequently at Maralinga about 200 km south.
Len Beadell built the roads and tracks to support this project, some of which are still accessible, although Maralinga access is still very restricted, and for good reason. See the findings of the Royal Commission.
 |
|
As close as we ever want to be to an atomic explosion
|
You can visit the sites of the Emu Field bomb tests and it’s quite an eerie experience standing on the very point where an atomic bomb was exploded. Not many people do that and survive!


 |
|
Lumps of molten sand from the blast
|
It’s a weird feeling being at ground zero and seeing lumps of molten glass all around you. See our blog here for a more detailed review of the British Atomic Test Program in Australia.
The first 2 bombs, code-named Totem 1 and Totem 11 were 9.1 and 7.1 kilotons respectively, not big by super-power standards, but they made quite a mess of the ground. Of the 100ft towers they were mounted on, only a few buckled frames remain on the ground, and the surrounding desert is covered in glassy lumps of molten sand where it was heated to incredible temperatures by the explosion.
 |
|
All that remains of a 100 ft tower
|
Concrete obelisks now mark the Ground Zero points and a level of radiation still remains, but it is no longer classed as dangerous for casual visitors and there are no restriction on visits. Radiation is now at a low enough level to allow short duration visits, but not permanent habitation in the area. Prudence suggests that visits be as short as possible, and no earth or other souvenirs, like glassy lumps of molten sand for the mantelpiece, should be taken away. They might glow in the dark, or worse.
Emu Claypan and Airstrip
 |
|
Emu airstrip is just as good now as when it was built
|
The airstrip on Emu claypan is a larger all weather airstrip prepared by Len Beadell for subsequent tests and is still in good condition today. Originally there was a residential village established nearby and the whole area was known as Emu Field, but little of it now remains. Odd pieces of old electronic equipment are scattered around the northern end of the airstrip.
 |
|
Emu Airstrip
|
Ironically, Emu Field was subsequently determined as being too remote for follow up tests. Now you would think that remoteness would be a prime requirement for atomic tests, but apparently not. A location more convenient to the Trans-Australia railway was sought so Len Beadell was tasked to find a suitable site and Maralinga was the result.
Anne’s Corner
Anne’s Corner is at the junction of the Mt Davies Road built by Len Beadell in 1956 to provide direct access between Emu Field and Giles Meteorological Office about 600 km to the northwest.
 |
|
Len Beadell’s plaque at Anne’s Corner
|
One of Len Beadell’s original plaques is located at here, bolted to star droppers in a 44 gallon drum, it’s dated 1956, and located 200 M (300 km) west of Coober Pedy, 400 M (600 km) east of Neale Junction and 260 M (400 km) from Mt Davies.
The Mt Davies track is not widely used and permits can be difficult to obtain as it crosses several aboriginal lands. A sign written on the oil drum points up the Mt Davies Road and reads “Good Track. Need plenty of tyres etc. Very overgrown track. Car needs paint job”.
 |
|
A Trig Point on a nearby sand dune
|
As we progress slowly westwards, the corrugations get progressively worse but the scenery gets better. Superb rings of spinifex cover the red sand dunes and camels wander on and off the track, mostly on, and why wouldn’t they? It’s direct, smooth (compared with spinifex) and they can see where they’re going.
 |
|
Spinifex rings along the track
|
 |
|
Camel. Dead ahead
|
A Loud Clonking
At almost the geographic centre of the track, at 2.44 in the afternoon, there was a sudden and very loud clonking from the front drive shaft area of our Oka, so we stopped (obviously) to check it out.
 |
|
Looking for the source of the loud conking
|
An initial inspection didn’t reveal anything wrong with the axle or diff or axle shafts, but then I found that the rear of the drive shaft had come loose and had been flailing around hitting the transfer box gear linkages as it went. The “U” bolts holding the universal joint on to the transfer box had worked loose allowing the end caps and needle bearings to fall out, which in turn allowed the shaft to disengage from the transfer box.
 |
|
The pivot bar for the transfer box controls was badly bent by the loose drive shaft
|
 |
|
Removing the drive shaft
|
I took the shaft off and was going to replace the whole UJ unit, but Craig suggested replacing just the end caps from a spare UJ which would be a lot quicker than replacing the whole thing.
 |
|
Fixing the broken drive shaft
|
This we did, and with new bolts holding the UJ clamps in place, everything was greased up and we were back on the road within an hour. But it could have been much worse, the main gearbox and engine sump were right next to the flailing shaft.
We also had to do a temporary fix on the damaged gear linkage to get that operational again since it was bent and touching the exhaust pipe. We used extra large plastic tie-wraps (12mm wide) to hold the transfer linkage in a useable position but this worked fine and survived a further 12,000 km without problems.
While the blokes were working on the problem, the girls were taking photos of our bums protruding out from under the vehicle. Perhaps it was to ensure that we had a photographic record of the event?
Post trip note: The main damage was to the pivot lever on the side of the gearbox which directs the transfer lever action to the transfer box via a ball joint. It is a 6mm thick steel lever which was bent severely by the impact of the flailing drive shaft, causing the ball joint to be twisted and the transfer rod to foul the exhaust pipe. It took a lot of effort to bend that straight enough to operate normally again.
Vokes Hill Corner.
Vokes Hill Corner is at the junction of the road from Cook on the Trans-Australia railway built by Len Beadell in 1961.
 |
|
An epistle reading from the visitors book at Vokes Corner
|
Another original plaque is located here (19 nails holding it to the post), dated “from star observations on 2 April 1962”. It shows we were 100 M (160 km) west of Emu and 180 M (280 km) north of Cook and only 555 M (900 km) to go to Laverton. It’s the only plaque we’ve seen with a personal message from Len Beadell to “please leave this sign for travel(l)ers”. He decided too late that 2 “L”‘s were required and added a second.
 |
|
“Please leave this sign for other travellers”…
|
There is a feint track to the actual Vokes Hill, 14 km NW of the junction. It even has a Give Way sign on it. However, the height of Vokes Hill is only 347 m, which is lower than some of the surrounding sand dunes. There must be some other history attached to it.
 |
|
The brilliantly named Unnamed Conservation Park
|
Vokes Hill is within the brilliantly named Unnamed Conservation Park, (which now, after 29 years has a real name, it was renamed the Mamungari Conservation Park in 2006) and extends over 21,000 sq km of pristine arid zone wilderness. The Anne Beadell is the only road access in or out of the park and the name boards had yet to be replaced in 2008.
Interpretive Markers.
As we moved westwards from Vokes Corner, we kept seeing green posts with numbers on them. I’ve since discovered that they are interpretative markers put in place by the Friends of the Great Victoria Desert (FGVD), who are “a volunteer group which assists the rangers in caring for the parks and reserves in the South Australian section of the GVD”.
The posts apparently indicate the presence of particular species of plants in the area. I wish we had known that before we left, it would have solved a question and added to our enjoyment and understanding of the track.
More information can be obtained from the FGVD web site at Friends of the Great Victoria Desert.
 |
|
2 Oka’s and a UniMog
|
We met a big UniMog coming the other way and stopped for photos.
Serpentine Lakes.

The Serpentine Lakes straddle the SA/WA border and are normally a series of dry salt lakes. Officially they are a “significant palaeodrainage system, comprising ephemeral saline playa lakes”. Well they were certainly ephemeral when we passed through in 2008 but they do sometimes flood, see Serpentine Lakes with water (see beadelltours com.au).
 |
|
“A significant palaeodrainage system, comprising ephemeral saline playa lakes”
|
 |
|
A steep jump-down to the lake bed
|
There was a very steep jump up (or down) on to the lake bed on the SA side but the track across the lake was smooth and dry.
SA/WA Border.

|
Hand marked distance to Laverton
|
The state border is just on the west side of the Serpentine Lake crossing and is marked by another original Len Beadell plaque. What’s interesting on this one is that the distance to Laverton (455 M) is engraved (scratched) on the plaque rather than stamped on. It suggests that it was not Len Beadell who did this since if he measured the distance in his LandRover he is sure to have taken his letter punches with him. The distance to Vokes Hill (110 M) is stamped on as normal.
Ilkurlka Roadhouse.
The aboriginal owned Ilkurlka Roadhouse appears as if by magic after a week’s travelling. You get the feeling that you will never see civilisation, or even a smooth road again, when suddenly there it is, a campground with a small modern shop, showers and fuel supplies.
The manager also owns a grader and the 20 or 30 km either side of the roadhouse are reasonably smooth compared with the previous 1000 km.
The manager told us we were lucky to catch him there as he was leaving the next morning to meet someone in Perth, a trip he expected to do in a day! Well it was only 1400 km.
While we were camped at Neale Junction the next night, I was out doing my late night ablutions when there were loud rumblings and crashings and flashing of distant lights from down the track and a few minutes later the manager roared by in his ute. You would think that in the middle of a desert, late at night, you could get on with your business without being caught by the glare of car headlights. But as he rushed past with horn blaring, he gave the very real impression that he really was going to make Perth in a day.
Aircraft Wreck
 |
|
This aircraft crashed in 1993
|
 |
|
Directions to the aircraft wreck
|
In 1993, a Goldfields Air Services twin engine Cessna crash landed in the desert about 50 km west of Ilkurlka and 6 km north of the track. The crew survived the crash and were rescued. In 1995 a track was formed over the sand dunes to the crash site and most of the plane still remains, except, of course for any valuable parts which have been souvenired. It’s a worthwhile diversion but the track is fairly difficult as it crosses about 20 very soft sand dunes in its 10 km.
Man Made Rock Formations
 |
|
Strange rock formations…
|
About 25 km before Neale Junction, we came across an abandoned airstrip and nearby were strange manmade, possibly aboriginal, rock arangements spread out over several hundred metres.
 |
|
… stretch for several hundred metres…
|
These could not have been constructed in an afternoon but had obviously been planned and implemented over a long period of time.
 |
|
… alongside the track
|
The formations are of small rocks placed in circles, lines, zigzags and curves but without any obvious overall design or purpose.
They remain a mystery. Interesting but still a mystery.
Rest Stops and Water.
On the WA side of the border, there are 3 rest facilities with toilets and rain water tanks. These, apart from the Ilkurlka roadhouse and possibly Yeo Homestead, are the only sources of drinkable water on the Anne Beadell, and even then availability depends on rain. We were lucky that there was some at the one nearest the border and we could replenish our drinking water tank, but it’s sensible not to rely on them, or waste the water, and we carried sufficient for the whole journey, even though that meant no showers for a week.
There was no water on the SA section of the track, Tallaringa Well was not useable.
Neale Junction.
Neale Junction is an important intersection with the Connie Sue Highway which stretches from Rawlinna on the Trans-Australia railway in the south to Warburton community on the Great Central Road to the north. That’s the track we plan to tackle next.
 |
|
Len Beadell’s plaque at Neales Junction
|
There is another Len Beadell plaque and visitors book here. On this plaque all the GRCP members are named, including their dogs Bonnie and Lassie.
We are now 600 M (1000 km) from Coober Pedy with 240 M (400 km) still to go to reach Laverton, but even so we began to feel like we were approaching the end of the track.
I got in the car to move it from the junction to a camping area and turned on the ignition (which is a bit of a misnomer in a diesel) but instead of a hearty roar there was just a faint click from the starter motor.
 |
|
Stuck at Neale Junction with a battery problem
|
Now the starter motor is one of the few single-points-of-failure we have in our vehicle, most other problems can be got around but we don’t carry a spare starter motor, and this is a particularly bad place to have a failure when it’s a single point of one.
However the planets must have been in alignment that day since it turned out to be just a loose connection on the battery terminal, tight enough to provide normal power but totally insufficient to start the engine. A twist on the connector was all it took to fix the problem.
Later I checked and tightened the terminals on all 3 batteries.
Bishop Riley’s Pulpit.
The track started to get wider and less corrugated as we left Neale Junction and even the weather was warming up. We’d had freezing nights for the past week or so.
 |
|
Bishop Riley’s Pulpit
|
We stopped to investigate Bishop Riley’s Pulpit, a rock formation just off the track in the Yeo Lakes Conservation Park and met a large convoy of 4wd’s all busily fitting tarps over their radiators. One of them even took a photo of us arriving and posted it on the web.
 |
|
Photo of us arriving at Bishop Riley’s Pulpit
|
It seems the group was heading off overland (hence the spinifex guards on the radiators), following the route of explorer Frank Hann’s 1903 expedition from Laverton to the Warburton area. And cutting off the corner between the Anne Beadell and Connie Sue Highways whilst doing so.
While all this sounds like good fun, I’m not sure I agree with the concept of large numbers of vehicles bush bashing across a pristine desert, even if it is in the name of scientific discovery. Hopefully this group was following established, if unmarked, tracks.
Yeo Homestead.
Yeo homestead is a restored 19th century wooden house comprising 2 rooms and “outside” facilities. It used to be the homestead for Yeo Station before CALM created the Yeo Lake Nature Reserve.
 |
|
Yeo Homestead, a good place to stay for the night
|
It’s a good place to stay for the night, it provides shelter but it’s a bit dusty inside.
 |
|
The outside shower at Yeo Homestead
|
The old style dunny, shower and well down the “garden” are worth investigating.
On the maps there are various tracks leading to the lake but after 11 days on the Anne Beadell, we’re rather keen to get to Laverton and a real shop. We’ve marked this down for more exploration on our next trip. In fact the whole of this area looks worth spending more time in.
Trip Summary.
When we eventually reached Laverton, after about 11 days constant travelling due west, we headed down to Kalgoorlie and met up with an old friend at the Oka company there.
The chart below shows our speed along the Anne Beadell Highway. Around 25 kph for most of the first 900 kms after leaving Mabel Creek, but definitely slightly faster in the WA section, up to 50 kph plus in sections. Wow!
 |
|
Our speed profile on the Anne Beadell Highway
|
The dip in speed at 950 kms was when we visited the site of the crashed aircraft about 10 kms off the track. There were a lot of sanddunes to cross in that 10 kms.
 |
|
Western end of the Anne Beadell Highway at Laverton
|
Overall our impressions of the Anne Beadell were that it is very long, fairly flat and not overly difficult, if you and your vehicle can stand the corrugations. There are plenty of things to see and some areas really need more time to explore properly. Although 11 days seemed like a long time to be on one track, it was no where near long enough to take it all in. When we do the Connie Sue maybe we’ll use that opportunity to explore the Plumridge Lakes and Yeo Lakes areas better.
Recovery and Maintenance Gear
We carry a reasonable amount of Recovery and Maintenance Gear in/on our Oka, nearly all of which we have used at some stage, often to assist other travellers. However it is too easy to go overboard on recovery gear, most of which you hope you’ll never need. Some weight/space compromises will inevitably need to be made, ie non-critical domestic items used everyday, vs rarely used but essential recovery gear and tools.
See this useful article on recovery gear from 4WD Overlander and this Survival Guide which includes vehicle recovery advice.
See this useful article on recovery gear from 4WD Overlander and this Survival Guide which includes vehicle recovery advice.
—————————————–
Recovery Equipment we carry.
- These are the items we wouldn’t leave home without and, apart from the fire extinguisher, we have used all of them at some time:
1) Jacks
- 60 inch Hi-Lift Jack plus a thick 300×300 mm plywood base plate. (You could buy a proper Hi Lift base plate for around $44, but a piece of plywood is more useful and economic. To stop it sliding, drive in a few Tek Screws to match the holes in the foot, or screw some strips on the top and bottom).
- We have also fitted extra high lift jacking points (cut outs) to the outside of our bullbars.
- A Hi-Lift jack can also be used as a winch for short distances.
- An overhaul/repair kit for the Hi-Lift jack is worthwhile, in case you break something (like the shear pin). Note, in the event of wear on the heavily used section of the centre climbing bar, it can be reversed while renovating the jack.
 |
| Hi Lift Jack bolted across the front bull-bar for quick access. It has a centre support as well to reduce whipping on corrugations. |
- 3 tonne Double Acting Screw Jack plus 4 inch hard wood timber block, to ensure adequate lift height can be achieved. Most hydraulic jacks (except double acting versions) have only a limited lift height.
- Many jacks only have a small round flat tip (saddle) which can be very dangerous under a curved, dirty surface. Ensure your jack has a broad cupped tip or saddle so that it can’t slip off round axle cases. You could easily weld something up.
- If you can’t get the jack under the vehicle, dig out hole for its base.
 |
| This can be a risky arrangement but the wheels are well chocked. The owners had no other options in this case and fixed their wheel problem safely. The tyre came off the wheel and went bush. |
- Always use 2 means of support or jam a spare wheel (or similar robust object) under the vehicle (such as the diff) for protection before jacking or getting underneath. Hydraulic jacks can slowly lower themselves without notice.
2) Axle Stands, 2 x 3 tonne stands for safety while undertaking suspension and axle repair and maintenance work,
- The Screw Jack and Axle Stands are mounted in a frame under the rear right hand bullbar. Accessibility is not that good but they are maintenance rather than critical recovery items.
3) Hub/Jack Adaptor which allows a wheel to be lifted directly using the Hi-Lift jack without the need to get under the vehicle. A wheel lift strap (eg a Hi-Lift Lift-Mate might) also be useful if you have spoked wheels.


Hub Adaptor for raising wheels directly using a high lift jack. You’ll probably need to dig out a flat area for the base plate.
- These can be used for lifting a buried or submerged wheel, or if hung up on rocks. After it’s lifted, branches, sand mats or other supporting material can be packed beneath the wheel, or a jack/axle stand inserted under the axle to enable the wheel to be removed.
- Use with care on the front hubs since they are a smaller diameter and have thinner walls than the rear hubs. Make sure they fit snugly, with a ring adaptor, you don’t want a broken hub as well. At a pinch, a strap could be used around the hub instead, but would not be as secure. Maybe a tree trunk protector would work.
4) Winch Extension Strap, plus heavy duty Bow Shackles (4.75 Tonne SWL) and Equalising Strap,
- For use as a tow rope and for removing obstructions from tracks (even though we don’t have a winch, straps are much lighter than chains).
- Also useful for strapping an axle to the chassis after suspension failures, we know.
- Tow points are fitted to the front and rear bullbars.
-
Equalising strap allows both tow points to share the load.
5) Snatch Strap for recovering bogged vehicles, also useful for extending the winch strap although they do stretch of course.
- When joining 2 straps or ropes, always insert something solid (eg branch or hammer handle or rolled up magazine) between the loops so they can be undone more easily. Rope can cut through itself in a tight knot.
- Never allow anyone near a strap, rope or chain under tension in case something gives way, and put a towel or blanket over the strap so it can be seen.
- When pulling obstructions off tracks or towing other people out of boggings, we usually do it in reverse so we can watch what is happening and/or signal to them (hand-held CB radios are useful here too). People have a habit of leaving their hand brakes on while you are trying to tow them out, but why, when they are bogged anyway?
6) Spades, long and short handled. Removing the build up of sand in front of wheels is sometimes all that’s necessary to free a bogged vehicle. But when it’s not…
 |
| Small plastic sand mats after a successful extraction in a sticky situation. They were bought for a smaller, earlier 4WD and really need to be larger for the Oka, but they still worked fine. |
7) Sand Mats x 2. These can be any 300 mm x 1 m sheets of 12mm timber, tough plastic (shop bought) or expanded metal, preferably with a rough surface.
- Good locally made ones (around $250-300/pair) are available here and here and cheaper ones are also available here. But I think you could make some economically out of expanded metal sheeting (as used for security doors).
- I’ve also seen milk crates cut up and linked together to do the same thing. See here for some more ideas.
8) Air Compressor, air lines and gauge. We raise and lower our tyre pressures quite regularly on outback treks.
- Take a spare valve connection as they can fail.
- We can then also connect 2 tyres together to share air pressure if the compressor won’t compress. Keep the pressure in a spare tyre higher than normal (60 to 80 psi) for this purpose.
9) Tyre Repair Kit (ARB), plus 2 spare wheels which can be used as chocks, anchors or support blocks,
10) Jumper Leads, not just for flat batteries but for bypassing a faulty solenoid, connector or battery strap, and to connect batteries in series to form a welder,
11) Warning Flag or Cone (or Strobe/Flare Flash Light after dark), to warn others of your predicament, to protect yourself and thus avoid making things worse. A sand flag and pole (or any tree branch) can be used for this purpose.
12) Fire Extinguisher, diesel is probably OK but gas can leak, and fire can remove “time” from your recovery options,
13) Wood Saw. Some people carry an axe or even a small chain saw, but axes are heavy and dangerous in inexperienced hands, and not very efficient. A curved wood/pruning saw is very useful,
14) HF Radio. This might seem a strange item in a list of recovery gear but communications can assist with information, advice or actual help, which might well be closer than you think. (A Satphone might prove a useful alternative, a CB radio less so).
—————————————
Maintenance Gear we carry:
This includes the essential tools and safety equipment (glasses, gloves) for use of the above recovery gear. We also carry the spare parts (usually only one of each type) and the tools necessary to repair or replace items which directly affect the three key areas of mobility, safety or reliability.
- Mobility: wheels, wheel bearings (one of each type plus spindle lock washers), driveline (UJ and bolts, free wheeling hub components, gear linkage joint), suspension parts (U-bolt, suspension pins and bushes. We also have a spare half spring leaf to temporarily repair a broken spring eye), engine spares (fuel lift pump, belts) and cooling (hoses, thermostat and gasket, radiator repair gunk),
- Safety: brakes (pads, calliper keys, key bolts and spring clips), steering (tie rod ends, LH and RH). We don’t actually carry any tie rod ends yet but we probably should. A bush mechanic can probably fashion a temporary joint using wire or rope to a long bolt though the hole,
- Reliability: electrical parts (starter and alternator brushes, lamps, fuses and wire), lubricants, filters, oil seals (rear hub mostly since they run in diff oil), belts, cable plus small u-bolt clamps (to repair clutch, throttle, park brake cables).
Tools used in the workshop to make repairs are pretty much the tools you’d need on the side of the road too, particularly any vehicle specific tools. Other travellers will usually have standard tool kits but few would have a 2 1/2 inch box spanner for hub spindle nuts, for example.
—————————————
Emergency Repair Gear (when all else fails, make use of these types of items):
- Fencing wire, large plastic tie-wraps, rope,
- Small u-bolts to clamp wire and cables, hose clips,
- Tent pegs, aluminium, plastic and steel angle/sheet,
- Old shocker bushes (steel and rubber)
- Switches, electrical wire and terminals, small water pump (usable for diesel transfers),
- Welding rod holder, rods, eye guard and leads (put 2, preferably 3, car batteries in series with jumper leads to make a rudimentary welder),
- Gas blow torch,
- Bits of metal or rubber found on the side of the road. (It’s quite surprising what useful material can be found discarded, or more likely fallen off something, on the roadside).
—————————————
Notes:
1) Higher Lift Jack. For an Oka or other high clearance vehicle, a standard 48 inch high lift jack is inadequate as it can’t lift wheels clear of the ground before running out of height (unless using a Hub Adaptor or Wheel Lift Strap). You’ll need the 60 inch version to do any serious repairs to the springs or suspension pins. See here for a useful article.
2) Exhaust Jack. I wouldn’t even consider an Exhaust Jack (the blow up balloon type jack). They may appear tempting, since they are light and easy to use (but not cheap), but they are unstable, unsafe and require a flat surface on the bottom of the vehicle, which most don’t have, especially an Oka. Plus they need smooth flat ground and isn’t it always just like that when you need to jack up the vehicle?
3) Accessibility. Ensure critical recovery gear is accessible from inside your vehicle as well as outside. In the event of a bogging or partial roll over, external access might be impossible, eg if a high lift jack or spade is carried under the rear or in a compartment blocked off or behind a stuck door. We’ve seen it done, we had to recover a ute that slid into a drain on the Bloomfield Track, his spade was trapped under the ute.
4) Does it work? It might seem blindingly obvious, but ensure that all your recovery gear actually works before leaving home. We’ve met people whose jacks aren’t high enough (or low enough to get under a vehicle with a flat tyre), whose spare wheels don’t fit, without adequate jacking or towing points, or who simply don’t know how to use their (newly bought ARB/TJM) equipment.
5) Winching? We don’t have a winch. They are heavy to carry around and on the few occasions we’ve been stuck there was no suitable anchor point available anyway. Winches also generally only pull in a horizontal plane, which is handy for pulling other people out, but often you’ll need a vertical lift, hence our Hi Lift jack.
- Rule # 1, don’t go anywhere or get into anything that you might not get out of.
- If Rule # 1 fails (which can happen to any of us), and you can’t lift or dig yourself out safely (and working in the hot sun, harassed by insect pests can be very uncomfortable), first protect yourself from further risk using flags or similar, take a break and wait, either for inspiration (see Point 6 below), or for help to arrive as it surely will, however embarrassing that might be. Don’t unnecessarily break your back, or worse. You’re on vacation, there’s no rush. It may be a challenge but it’s probably not a disaster.
- If you do have a winch, you’ll also need good batteries (unless it’s a PTO model), a pulley block, tree trunk protector, a cable dampener and possibly a ground anchor and cable extender. These all take up more weight and space and have really only one function, which hopefully will seldom be used. See here for an interesting discussion on the pros and cons of fitting a winch.
6) Problem Solving: Manuals (and/or files on your computer), and information on how to recover a vehicle, can provide a range of alternative ideas on solving a recovery problem. Don’t forget the ideas of other members of your party or other well meaning travellers who will no doubt stop to assist but don’t be pushed into something until you’ve considered all possibilities.
- In the 6 years we’ve been touring with our Oka (plus many years of 4WDriving before that), our learned response to a crisis is to do nothing, at least initially (unless there is an urgent medical/safety situation), until we have consider all the options (and yes, spouses are often a useful source of alternate ideas).
- In the meantime, we erect some warning devices (flags, milk crates, branches or similar placed 50m either side of the stranded vehicle) and get on the HF radio to get some advice or report the dilemma, it’s free and anonymous.
- Rushing into something might make a bad situation worse, and the next morning things often don’t seem quite so bad, tracks have dried out, or help has arrived or a brilliant solution has come to mind overnight. Even if they don’t, you’ll be rested (unless you’re stuck at 45º) and better able to tackle the problem.


After a sudden downpour, too slippery to move… ….. and the next morning, mostly dried up.
7) Membership of motoring organisations might prove useful in urban environments or even on major highways, but on remote tracks it will prove ineffective. Even if you can contact them, it might take days to get a tow truck out your way (if at all) and towing is all they will do, they don’t carry adequate spares to fix any vehicle and the extra costs might be prohibitive anyway.
- Last year we helped a stranded motorist near Eromanga on the Tibooburra track, a Commodore(!) with 2 shredded tyres, a soft spare and no compressor. We contacted the RACQ who eventually sent a tow truck 240 km from Thargominda but it took several days to arrange and even then they would only tow him back the way he came.
- In 2008, a Discovery was stuck on the CSR for 3 weeks with an engine management problem. Tow trucks sent from Halls Creek by the RAC WA tried, but couldn’t reach them and eventually they were towed out very laboriously over hundreds of sand dunes by another very kind traveller who put his own vehicle at risk.
Much better to be self-sufficient, and luckily you can be in an Oka.
